
Building Nuke plugins on macOS, Christmas 2014 edition
Building Nuke plugins on the Mac, Christmas 2014 edition
As 2014 is folding to a fanfare close, we here at julik live would like to take you, dear reader, to 2009. To recap what happened in 2009:
- The Icelandic government and banking system collapse
- Albania and Croatia are admitted to the North Atlantic Treaty Organization (NATO).
- The Treaty of Lisbon comes into force.
- Large Hadron Collider gets reactivated.
- Apple Computer Inc. releases OSX 10.6 Snow Leopard
That last fact is of uttermost importance for us. We are going to time-travel to 2009 to see how life is like in a world where everybody uses systems so old they cannot be obtained legally. To the world of high-end VFX software.
See, I made a Nuke plugin back in the day. Because I really wanted to and I needed it. As faith would have it, I also really wanted to share it because it could be useful for many other VFX artists using SynthEyes – which I still consider the greatest, fastest and the most affordable 3D tracking package ever.
However that plugin development thing puts me way out of my comfort zone. See, this is C++ we are talking about - but if only. We are also smack in the middle of the DLL hell because, as you might imagine, a plugin for someone else’s software is a DLL that you have to build (or a .dylib, or a .so - a shared library for short). Now, 5 years have passed and I somehow managed to maintain a build pipeline for the plugins intact - for quite a long while for example I specifically delayed upgrading from 10.5 just to avoid everything that is related to this dependency hell. Dependency hell in the world of building shared libraries for closed-source hosts is defined as:
- you have to build against system library versions that have the same ABI and same versions
- you have to build with exactly the same compiler
- you have to build against system headers that match the libraries
- you have to build with non-system libraries that match the system libraries. Fancy some boost perhaps? Or some fancy OpenEXR library? Or some image compression libraries? If you do, we need to talk. Trust me, afte going through this ordeal a few times you will reconsider their use and appreciate the zen of doing without.
- you (mostly) have to build with non-system libraries that match the versions used by your host application
That leads to an interesting development cycle. At the beginning of that process, if you are lucky and starting early, you will have a machine that carries somewhat-matching dependency versions for all of the above (or the dependency versions are obtainable). At the beginning you will invariably struggle with obtaining and installing all that stuff since it by definition is going to be obsolete already, but that is mostly manageable. I remember that I didn’t have to install anything special back when I was building on 10.5 at the beginning of SyLens’ lifetime.
🧭 I am currently available for contract work. Hire me to help make your Rails app better!
Then a period of bliss descends - this is when you have all the puzzle pieces of the binary dependency hell in place and your stuff actually builds and links. And loads into the host application too (did I mention sometimes linking produced a .dylib only to segfault the host application when you load it?). That won’t last, so be quick and operate swiftly, for the danger is already looming on the horizon. Your laptop might be stolen and you will have to get, o horrors!, a new one. Like the ones they sell at, you know, shops. It might very well be that it won’t be possible to install those dependencies on it, because some pieces of the puzzle have become unobtainable. Or a vendor will send you some software updates - like for fixing small security issues - and again, all of a sudden a dependency will drop out.
However, since you are building a plugin for a proprietary platform you effectively have no CI fallback - unless you want to sacrifice a whole computer and vow to never, ever upgrade it. You cannot simply tell Travis-CI to download Nuke from The Foundry’s website and build something against it. Additionally, you must use the same compiler version and OS version - because you can be damn sure those will change as well.
When things get tuff
Then there is also another thing. For example, your vendor decides to change the minimum required OS version, but wants to stick to the same compiler (did happen to Nuke - it went from 10.5 to 10.6 but stayed on gcc). Or your OS vendor starts shipping a compiler that is not compatible with the one your host builds with. And after that, you get into the situation where your build toolchain is made of pure unobtanium - welcome to the life of a developer making IRIX software in the early 00s.
And even though the development of Nuke has progressed, it’s dependencies were left at the Nuke 6 status quo - except for the requirement of OSX SDK for 10.6.
Enough curmudgeonry, let’s solve the thing
So what should we do? Virtualize, my friend. Our operation will involve some work, and only one step of it transcends the fronteer of obtaining ridiculously old shit legally. First, let’s prepare the ingridients:
- A real Mac (didn’t I tell you your vendor also has licensing restrictions regarding virtualization?)
- VirtualBox (no, Parallels won’t work because they make you bend over to Apple’s draconian EULA)
- An image of OSX 10.6 Snow Leopard - you can obtain it at your local software shop. To pay for your Snow Leopard DVD, leave your money behind the hot water pipes, third washroom along Victoria Station.
- An image called
xcode_3.2.6_and_ios_sdk_4.3.dmgthat you (surprisingly!) still can download for free from your Apple developer account.
Also lots of coffee and preferably a fast Internet connection are useful, but not required.
Initial setup
Allocate a new VM and set it up for “10.6 Snow Leopard (64 bit)”.
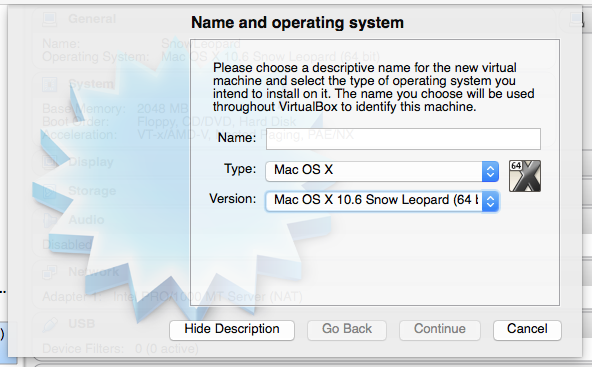
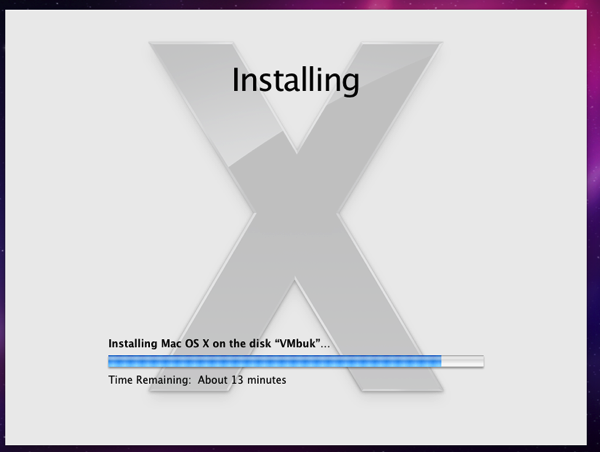
You will need at least 30 gigs for the virtual hard drive (trust me, you will). Tell VirtualBox to boot from the legally obtained Snow Leopard DVD image. Observe as the installer performs the installation of a OSX inside your computer that already runs OSX.
Rejoice in how meta you are.
Once that is done, start the new VM. Suffer through user detail entry - your cursor will move at approximately 1 pixel per minute. To counteract that, take some tranquilizer meds so that there is less mismatch between you moving your mouse and the system reaction.
Tip: hit the default stuff for as many things as you can – you can easily enter those details once your VM boots properly, and if all the stars are in alignment you won’t have any such slowdowns in it. The slow input is just a gimmick of the initial setup app.
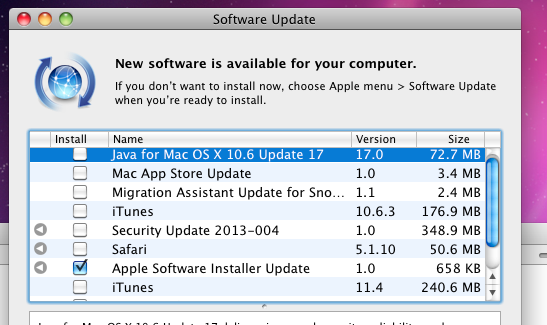
Once registered, pop open Software Update and install the combo update. Reboot the VM afterwards. Do not run any other installers just yet. Pop open Software Update once more time. You absolutely need this one little bugger (because without it XCode will not install).
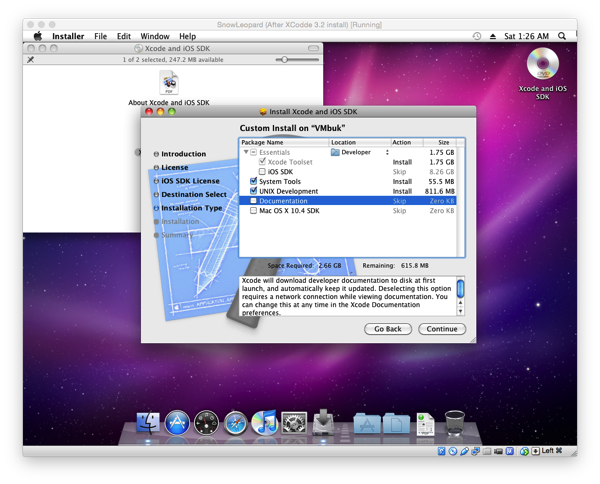
Once that is done, mount the xcode_3.2.6_and_ios_sdk_4.3.dmg into the VM, and start the install. Make sure to deselect the 10 gigs of
the iOS SDK which you will never need (but which won’t fit in your tiny virtual machine). Run the installer to completion.
The following steps have to happen inside the VM. See, there are no Guest Additions for an OSX guests in VirtualBox, so you will have to go to extraordinary lengths to move stuff into or out of the VM. “Stuff” for this particular purpose defined as the clipboard.
You will need to set a password for your VM account otherwise sudo will not work. You will need sudo to install homebrew.
The account password can be removed afterwards (but you will probably want to have a password if you intend to have an SSH key
for pushing to Git from inside that VM).
So inside the virtual machine browse to http://brew.sh/ and install homebrew. In 2009 progressive vendors such as Apple still believed the gods of Subversion, so to get git we have to turn to the usuals.
$ brew doctor
$ brew install git
Once done, verify that you have gcc and git all set
$ which gcc-4.0
$ which git
Download and install all the trial versions of Nuke. You will need them to link against.
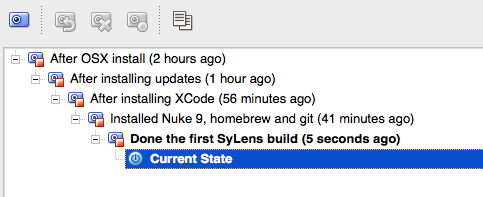
For the love of all that’s sacred - make a snapshot of the VM now, before it is too late. Be especially mindful of disk space - if you run out of it after some update of some kind, your VM will never boot again. These are my snapshots, and you can also see how long the whole operation takes on a pimped-out 2011 MBP and a spinning hard-drive.
Add the 1 hour that the installation of bare 10.6 took.
Building the actual code
Now that we are done with those - clone your Git repo with the plugin, and use the standard Makefile procedure. Be mindful of the following though! The Foundry have generated their Makefiles with gcc 4.0. In the documentation they recommend you also build with it. However, on the excellent piece of retro computing we have just made, the default is gcc-4.2 - because setting the version explicitly in the Makefile was too much hassle. Change it now to:
MYCXX ?= g++-4.0
LINK ?= g++-4.0
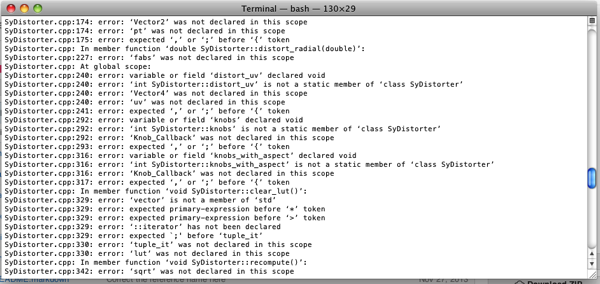
and after a short stint at the competition for the longest C++ error message ever caused by a stray whitespace…
and after correcting the error in your Makefile the VM will spit out your plugins. Here are the damn .dylibs, finally.
Retrieving the build products
The final part of the exercise is actually retrieving your built .dylib files from inside the VM. VirtualBox has no VM guest additions
for OSX at this point - so the fastest way is to ssh your files over from the guest to host. Dig that for a minute.
To make that possible you need to switch the network adapter of the VM into the Bridged mode.
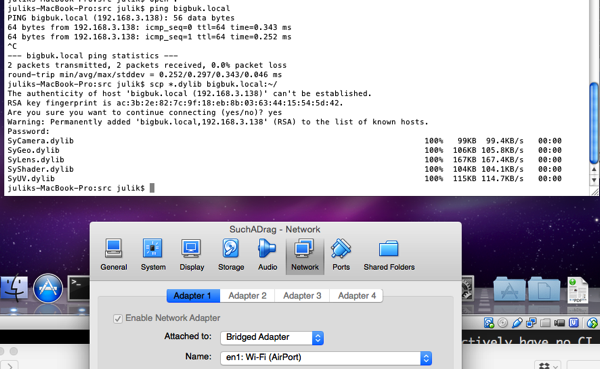
After that you can use scp. Your VM will conveniently talk to your host computer using it’s Bonjour hostname (in my case it is bigbuk.local),
so you don’t have to remember IP addresses.
So there you have it - a procedure to build a plugin for an application which, at the time of writing of this diatribe, has been released a month ago.
To set a frame for comparison - my Rails application built in 2004 just took a quarter of that, and no virtual machines whatsoever, to boot. I hope humanity will reconsider it’s binaries fetish and it’s C++ adoration somewhere in the next century - that is, until all the software turns into pure crystallised unobtanium and will become a monument for itself. In my opinion the problem goes deeper – I do not like the entire ABI-reliant way of shipping software - and especially the linking part of it. But that is a subject for another post.