
UI algorithms: drag-reordering
A list where you can reorder items is one of entrenched widgets in UIs. Everyone knows how they are supposed to work, they are cheap to build, intuitive and handy. The problem is that they often get built wrong (not the “just grab Sortable.js and be done with it”-kind-of-wrong, but the “Sortable.js does not provide good user experience”-kind-of-wrong). I’ve built a couple of these for various projects and I believe there is an approach that works fairly nicely. So let’s build us a reorderable list with drag&drop. As usual, we will be doing this laaaive without React and without any libraries.
🧭 I am currently available for contract work. Hire me to help make your Rails app better!
A few disclaimers before we get started:
- The examples I give here are not accessible. This should be better.
- I am not discounting the effort libraries like Sortable.js have put together, but I do believe they get some key aspects of the interaction wrong. And not only that, but as a result of their implementation (using slots as drop targets) the resulting interaction is worse for the end-user. That’s what ultimately motivated me to write this post.
- At the moment the examples in this article do not work on mobile, sorry for that. You can however extend everything described here to touch/pointer events.
Let’s talk reordering. Like so – try drag-reordering some items in this list.
See the Pen Proximity-based reorder (vertical) by Julik (@julik) on CodePen.
Let’s note a few peculiarities of this behavior. First, many reordering interactions on the modern web give you a “preview” of where the element is going to be inserted, like so:

…whereby the elements after the one you are inserting are moving out of the way and the elements being relocated are shown at the spot they would be inserted in if the interaction succeeds. The displayed elements are called ghost elements, at least this is the SortableJS terminology and I would consider it canonical at this point. This is the most popular (and rightfully so) approach on mobile devices. Indeed, on mobile this makes some sense, as finger motion is usually pretty crude and interacting elements are large.
I vastly prefer the second approach though, where the position where the reordering elements will be inserted is indicated by an insertion marker:
This is a much better approach where the elements being reordered are small, where the pointing device is precise – like a pencil or a mouse. But most importantly: it is less frustrating for the person providing the input. When we use the first – let’s call it “mobile” - model of reordering, the user has to “aim” for a moving target - an insertion marker that travels. Once you aim for an insertion point, by the time your drag reaches it the element you wanted to insert before or after has shifted to give you the preview. You then realise you are making a mistake, and drag to a different spot - only to find it shift just under your cursor. This can be incredibly frustrating, and – frankly – even on mobile there is a case to be made for not shifting the receiving area underneath the drag interaction unnecessarily.
Since this is about the implementation of the interaction, it helps to analyse the expectations the user would have when doing the reorder. When we reorder, we near-always start with a mental model of “placing these items before that item” or “placing this item after that other one”. That is: there is always an item in our list, or gallery, or what have you - relative to which we want to finish our interaction. Developing a good reorder depends on using this key observation: a reorder is relative to one of the participating elements.
To see how that is implemented in the list above, we can take a walkthrough of the algorithm.
When you start dragging, an event handler is installed for the drag event, which can supply the pointer coordinates as the mouse is moving. While it is moving, we continuously calculate the following two results:
- What is the closest participating element (box) we are dragging next to?
- Is the user’s likely intent to place the items before or after that closest element?
Take note of that second part! Many of reordering examples actually use existing items as slots onto which you drop your “traveling” item. In this example you will see the “receiving element” be used to show you where your dragged item would end up in the list. This is not a great idea, because “between” as well as “outside” of those slots there is no interaction cue at all! which is exactly what the user would want.
Here is something one should not do though: we should not try to do our detection in terms of “wanting to position this element between that element and that other element”. Why? Well, it makes one thing much less pleasant: placing the item at the end or at the start of our list. We’ll get there.
If this seems complex or intricate: it is. UI is hard.
Implementation: finding the closest element
We have two parts to this challenge thus: finding the closest element and determining the user intent. Let’s deal with the first one.
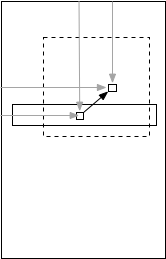
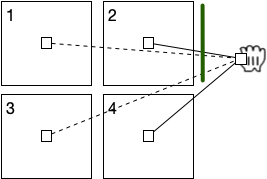
To figure out the closest element, we can do the simplest thing possible: calculate euclidean distances from the pointer to every participating element, and then sort them by those distances. The closest element is the one with the smallest distance to the pointer. Kind of like so:
Here the the shortest euclidean distance is the one indicated by the solid line. This is an extremely robust method with a whole slew of advantages:
- Unlike a “virtual line” which goes through the list, this approach works with items located in a gallery flow
- We only need to find one element relative to which the item is being placed
- For it to work the pointer does not have to be inside the closest element - or anywhere inside the participating elements for that matter!
💡 If you want to make this interaction more sophisticated: centroids work great when your participating elements are roughly of the same size. If your elements are very different in size it is possible that an element which is much larger but closer to the pointer gets discarded and a smaller element which is closer gets picked instead. Should that happen - use 5 points for matching instead of just the centroid. Take the 4 corners of the box and the centroid for that, optionally raising to 9 with midpoints of the box edges. This will give much more accurate snapping at the cost of 5 or 9 times as many computations and a slower sort. But for most applications just using the centroid will likely be good enough.
To compute centroids we will need the getBoundingClientRect:
  function computeCentroid(element) {
    const rect = element.getBoundingClientRect();
    const viewportX = (rect.left + rect.right) / 2;
    const viewportY = (rect.top + rect.bottom) / 2;
    return {x: viewportX + window.scrollX, y:  viewportY + window.scrollY};
  }
Note the addition of window.scrollX and scrollY here: these are important because we want page coordinates, not viewport coordinates. Like so:
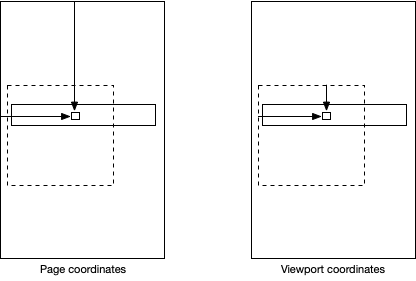
This will become important later. For now we will store all our computed centroids - along with their corresponding elements - in an array:
const participatingElements = Array.from(list.querySelectorAll("li")).map((element) => {
  return {centroid: computeCentroid(element), element};
});
Then we will need a function which will tell us the distance to our pointer event. Remember I told you that this scrollX will become important later on?
function pageDistanceBetweenPointerAndCentroid(evt, centroid) {
  return Math.hypot(centroid.x - (evt.clientX + window.scrollX), centroid.y - (evt.clientY + window.scrollY));
}
Note that you may as well use just the squared distance which allows you to skip a square root - all we want is to compare distances. A square root of a larger number will be a larger number, and will sort the same. I leave it with a hypot for clarity.
The story with subtracting scrollX and scrollY is this: we precompute and cache our centroids. The distanceSquaredBetweenCursorAndPoint gets evaluated for every participating element when the pointer moves and an event gets dispatched. The computeCentroid calls are done once - at the start of interaction - and our list can be large, so it might take a while.
The crucial reason for doing it this way is that “poking at the DOM” (doing the getBoundingClientRect) can be expensive, and there are benefits to doing it only once - at the start of the interaction. Doing some JS squaring will be very fast though, and will not touch the DOM.
When we take the snapshot of the centroid coordinates we are at a certain scroll offset. While we drag we can use the mouse wheel / touch gesture to actually scroll the document! So you should be able to pick up the item you need to place elsewhere, scroll the page, have the insertion point end up underneath your cursor position and drop the item. This is an interaction which is almost always bodged in Electron apps, and until fairly recently it was bodged in Spotify which made reordering playlists excruciatingly painful. Don’t do this to your user! Therefore, we do not want the cursor coordinates in the viewport (which is what we get by default), but we want it in page coordinates instead:
…so that we can then compute our distance correctly:
💡 Simplest thing in the world. But get it wrong at your peril: this is why users of Electron apps are often so frustrated. It’s the little things implemented wrong or incompletely.
Now we can set up an event handler on our drag:
list.addEventListener('dragover', (evt) => {
  evt.preventDefault();

  const byProximity = participatingElements.map((pe) => {
    return {d: pageDistanceBetweenPointerAndCentroid(evt, pe.centroid), ...pe};
  }).sort((a, b) => a.d - b.d);

  const closest = byProximity[0].element;

  // For now - cheekily dispatch a custom event
  const event = new Event("reorder:accepts", {cancelable: true, bubbles: true});
  closest.dispatchEvent(event);
});
And… believe it or not but this ends the “proximity” part! It really is that simple.
Implementation: determining before/after intent
Now things are about to get interesting. We know that if the user is close to an element, they want to sort relative to it. We also need to know “relative in what sense” – that is, do they want their new element before or after the one closest to interaction.
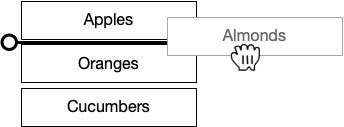
The naive approach would be to look at the second closest element and just decide that “it must be between this and that”. Like so:
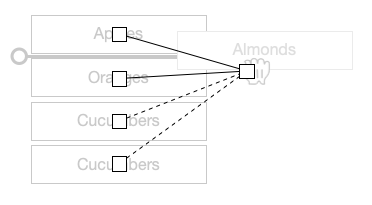
And it would work fine, except when it wouldn’t:
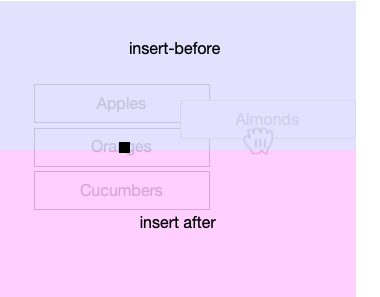
Here, the user clearly wants to place his Almonds at the top of the list. But our amazing algorithm will instead place his item between the first and the second element! It gets even better though. Let me introduce you to our friend…
The gallery
Try doing some reordering here:
See the Pen Proximity-based reorder (vertical) by Julik (@julik) on CodePen.
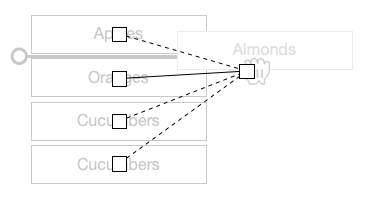
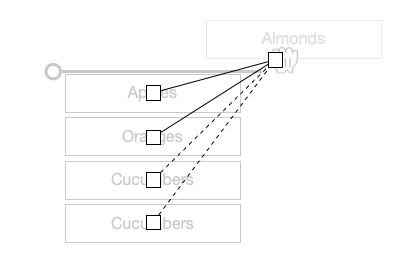
By a “gallery” I mean a flow-like layout of items which generally arrange in rows first, and columns second. In that case our algorithm for proximity sorting still works:
…but trying to grab the closest 2 items and say that we are sorting between them will give us items 2 and 4 which are not even adjacent in our list! And it gets even worse when we want to reposition the item to the start of the list or the end.
Instead we want to determine intent relative to just one element, without considering its siblings.
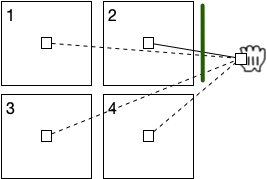
For that we can use binary space partitioning. From the centroid of the closest element, we need to pull a line dividing the entire viewport into a “before zone” and an “after zone” of the screen space. If our cursor is in the “before” zone, the user intent is to insert things before that element, and vice versa. For a list item in a vertical list, the “before” zone will be everything “north” of the centroid, and “after” will be everything “south” of the centroid. Below, our cursor is in the “before” half-plane, so the user intent is to insert “prior to closest”:
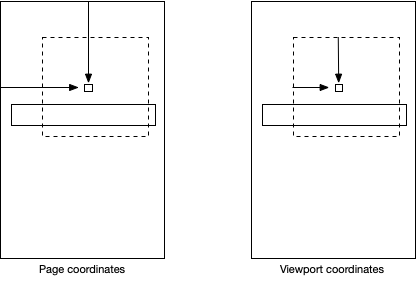
In our “gallery” example we do the same, but we partition the coordinate plane vertically. Everything left of the centroid of the closest element will be “before”, everything right of the centroid will be “after”:
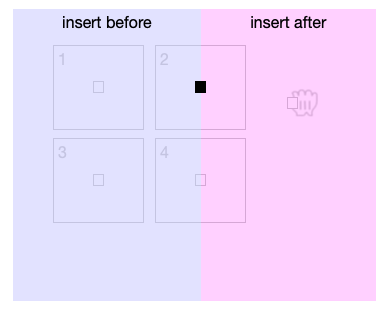
💡 Note that this is obviously left-to-right centric, you might want to swap this if you have an RTL gallery or a bottom-up list
How do we determine which partitioning to use, given that it depends on the shape of our list of items? We could make it a config option and force the developer to choose, but it feels lazy. There is a fairly simple heuristic though which allows us to detect the direction automatically: we already computed the coordinates of our centroids when the drag started, right? So we can look at the delta between the coordinates of, say, the first two centroids, and determine the most likely list direction based on that:
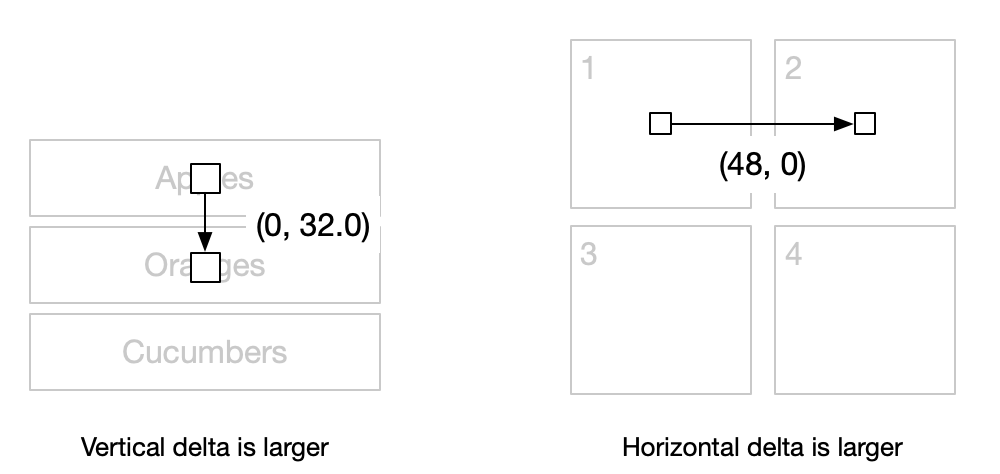
If dx is larger we assume (mostly) horizontal direction, if dy is larger we assume vertical direction. If we do not have enough information - for instance if our list consists of just one item we will need to take an arbitrary default.
const DIRECTION_HORIZONTAL = Symbol();
const DIRECTION_VERTICAL = Symbol();

function predictDirection(a, b) {
 if (!a || !b) return DIRECTION_HORIZONTAL;
 const dx = Math.abs(b.centroid.x - a.centroid.x);
 const dy = Math.abs(b.centroid.y - a.centroid.y);
 return dx > dy ? DIRECTION_HORIZONTAL : DIRECTION_VERTICAL;
}

const listDirection = predictDirection(...participatingElements);
This can be done right after we compute the centroids and cached - unless you allow resizes during drag.
💡 If you want to be even more precise, you can do something similar to what Sortable.js does and compute the direction of the list starting at your closest element. There is a challenge though, in that if you happen to end up on the last element in a row in a grid layout, you need to scan at least two adjacent elements in both directions (“up the list” and “down the list”) to figure out the dominant direction. I found just taking the first two elements works way better.
And now we can finally compute our intent (note that we need to add the scrollX and scrollY to
the event coordinates, so that we will be comparing in page coordinates):
const INTENT_BEFORE = Symbol();
const INTENT_AFTER = Symbol();

function intentFrom(direction, evt, centroid) {
  if (direction === DIRECTION_HORIZONTAL) {
   return ((evt.clientX + window.scrollX) < centroid.x) ? INTENT_BEFORE : INTENT_AFTER;
  } else {
   return ((evt.clientY + window.scrollY) < centroid.y) ? INTENT_BEFORE : INTENT_AFTER;
  }
}
and expand our event handler:
const listDirection = predictDirection(...participatingElements);
list.addEventListener('dragover', (evt) => {
  evt.preventDefault();

  const byProximity = participatingElements.map((pe) => {
    return {ds: distanceSquaredBetweenCursorAndPoint(evt, pe.centroid), ...pe};
  }).sort((a, b) => a.ds - b.ds);

  const {element, centroid} = byProximity[0];
  const intent = intentFrom(listDirection, evt, centroid);

  const eventName = intent === INTENT_BEFORE ? "reinsert:before" : "reinsert:after";
  // For now - cheekily dispatch a custom event
  const event = new Event(eventName, {cancelable: true, bubbles: true});
  element.dispatchEvent(event);
});
The rest is mostly implementation details - once you have the information where to sort to the rest is mostly DOM manipulation (or React prop wrangling, whichever rocks your boat).
More on inserting against a single element
With a list layout (vertical or horizontal) we could very well use an “is the insertion point between A and B” approach. However, using a single element by proximity and inserting before or after it has another pleasant side-effect: we can display the insertion marker where it makes more sense. Consider the following setup:
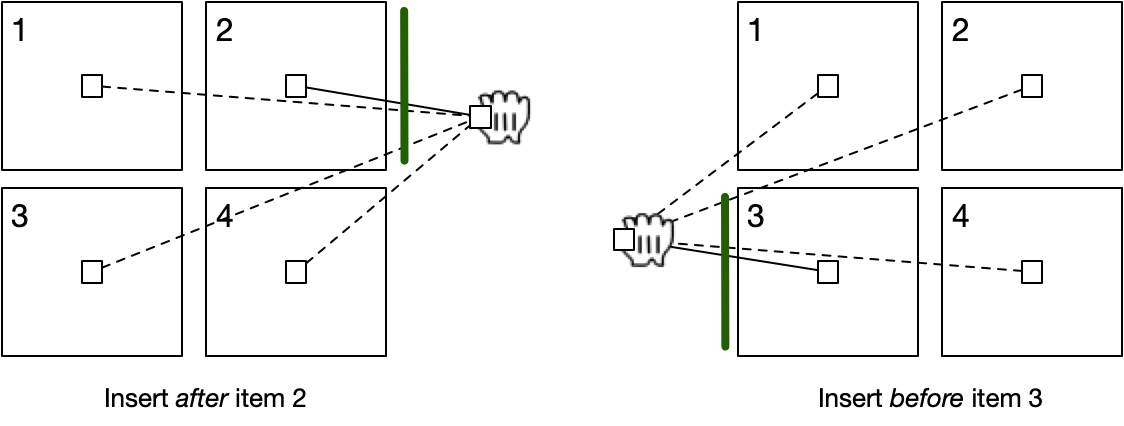
Here we can change the placement of the insertion marker. While both of these setups represent the same list mutation (insert between items 2 and 3) for the user there is benefit to showing the insertion marker closer to the item they are dragging next to. This can be easily achieved with some CSS smarts.
Note that this is a very reasonable case of I is for Intent as well! From the standpoint of state there is no difference where the new element will be inserted - it will be between elements 2 and 3. But from the standpoint of intent it is much better for the user to have visual feedback that the result of their actions will take place in proximity to the element they are hovering over. Seriously, this is a great article - you should go and read it if you haven’t already.
What happens after we know where to insert?
Well, that’s easy (or hard, depending on how many layers of JS framework are between you and the DOM). For example, we can add an insertion marker:
let marker = document.createElement(participatingElements[0].element.nodeName);
list.addEventListener('dragover', (evt) => {
  // *skip*
  marker.remove(); // remove the previous marker
  if (intent === INTENT_BEFORE) {
    marker = element.insertAdjacentElement('beforebegin', marker)
  } else {
    marker = element.insertAdjacentElement('afterend', marker)
  }
});
Or style our element relative to which we are sorting:
list.addEventListener('dragover', (evt) => {
  // ...
  participatingElements.map((pe) => {
    pe.element.classList.remove("inserting-before");
    pe.element.classList.remove("inserting-after");
  });
  if (intent === INTENT_BEFORE) {
    element.classList.add("inserting-before");
  } else {
    element.classList.add("inserting-after");
  }
});
In general, you would also want to capture the dragend event and then do your repositioning:
  const {closest, intent} = stop();
  if (intent === INTENT_BEFORE) {
    closest.insertAdjacentElement('beforebegin', li);
  } else {
    closest.insertAdjacentElement('afterend', li);
  }
since this finishes the interaction. I found it the easiest to do this using a setup which is similar to React hooks:
const siblings = evt.target.parentNode.querySelectorAll("li");
const stop = initiateReorder(siblings); // sets up event handlers, computes centroids and direction
evt.target.addEventListener('dragend', (evt) => {
  evt.preventDefault();
  const {closest, intent} = stop(); // removes the dragover handler etc.
});
With React there would some dances involved but you would end up with a similar setup.
Getting a bit more formal
Our reordering can again be expressed as a set of functions, and amazingly they have little to do with the DOM or CSS. If you are writing it in something like Elm this is your jam:
type ElementWithCentroid = (DOMElement, CentroidCoords)
type Siblings = [ElementWithCentroid]
type Intent = Before | After
type Direction = LeftToRight | RightToLeft | TopDown | BottomUp
insertRef(Siblings, Direction, PointerCoords) => (DOMElement, Intent)
and you would evaluate your insertRef at every change of the cursor coordinates.
It is a pretty neat algorithm:
- It gracefully handles insertion at the start or at the end of our list of elements.
- It captures user intent better by not requiring the user to drag inside the participating elements only.
- It gracefully deals with there being just one participating element.
- It can easily handle insertion of arbitrary objects - they do not have to come from the same list! they may as well be files dragged in from the operating system. Heck, you can even insert multiple elements! And combine it with the multiselect UI algo I have described earlier.
- It does lend itself well to caching as element coordinates can be precomputed.
Possible optimisations
I have applied none in the examples here, but the following are certainly possible.
- Use squared distances for comparison to avoid a square root per distance
- Match “pointer inside rect of element” instead of proximity for cases when elements have varying sizes, or do it on N closest elements only
- Cull away all the rects which are outside the viewport. This potentially could be done with an IntersectionObserver but increases complexity dramatically, as the observer is asynchronous.
- Compare less distances. This is known as the closest-point-problem and with a vertical list it can be done using binary search (did I already say binary search is one of my faves? yay binary search!) but it gets nasty with galleries since distances are not monotonically increasing away from the pointer as we progress through the list.
- Throttle the pointer events as they can be extremely frequent, just make sure you capture tail.
- Throttle / limit DOM restyles / node insertions, as you only need them to give visual clues to the user - not to support the algorithm.
- …for example, not restyling if your previously-detected refrence element and intent are the same as the current ones
- …or use a vDOM-something-something and have no implicit DOM twiddling
Wrapping up
UI algorithms are fascinating. Sadly, a ton of today’s web apps get “the little things” wrong simply because they have to be done very quickly, for cheap, and as soon as the minimum allowable version is shipped nobody cares anymore. But with a little TLC we can still have our nice things. Trig works. Thinking about the user works. Not getting coerced into the React view of “you may not touch the DOM” works. Have at it!